Questions re: DIY shower using wood slats
Hubby and I want a new bathroom. We plan to gut the current room and start fresh. We are toying with the idea of a shower that will mimic the outdoor wood shower we once had in Hawaii. Being this one will be in Minnesota, it will be indoors ;)
These are our thoughts so far: something on the walls for waterproofing (cement board?) and then the wood slats (rot resistant Ipe/cedar/teak maybe) affixed to the walls.
If we use cement board, is that waterproof? From what I've read, I think we would need to avoid products with gypsum and go for cement board with portland cement? And do we need to tile/or somehow coat the cement board before affixing the wood slats?
Also, any thoughts on this plan? Obviously it's a little unorthodox, but what would make it work? Would we be able to treat the wood with some product to enhance the richness of the wood, maybe give it a little more protection, or is that unhealthy in an enclosed space like that?
I'll try to post a pic of our inspiration showers.
Thanks much!
Commenti (32)

bud_cline
16 anni faI like your thinkin' and love stuff like that. I have built several outdoor showers at lakeside residences in my career and they are a lot of fun. I have used redwood, cedar, and cypress if memory serves. An outdoor shower doesn't have to be guaranteed against leaks but your indoor shower will. This brings me to my first question.
How would you preserve the integrity of the waterproofing of the walls while at the same time attaching the wood to the walls?
seedsilly
Autore originale16 anni faGood question! Wish I knew the answer! However, now that I look at the pic again, maybe if I do it just as in the pic that would not be an issue? I could use more tile, and only have wood where it is attached to stainless steel poles?
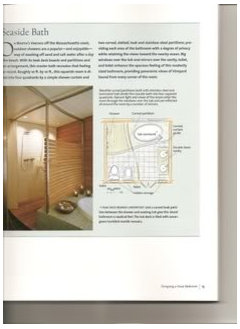
photo from a bath book
bud_cline
16 anni faCan wood be affixed to cement board with some type of adhesive?
I'm not sure if that's feasible with the constant moisture issues. The wood will need to move with climatic changes and I'm not convenced the adhesive would hold up.
seedsilly
Autore originale16 anni faaekekk: Thank you so much! ItÂs so good to know that this can work. I was starting to think that the bathroom in the picture I posted before was all for show and was not functional. I picture would be very much appreciated. Also, how did you affix the tongue and groove to the blue board?
Thanks again, I had all but given up! I'm very excited! And thanks for the info on how to seal the wood, good to know the urethane help maintain the woods beauty. Was the lovely scent able to come out through the urethane?
cherun_2008
16 anni fahave you decided if you will do the wood shower, we want to do ours in cedar, so any tips you find that work, please post them, especially about the type of sealer and how to attach.
seedsilly
Autore originale16 anni faI'm not any farther along in the planning. Still don't know how to attach the wood to the wall, but have wondered about "propping" it in place with architectural elements that look nice and also keep it firmly in place. For sealer, I am thinking about Waterlox Sealer Finish, and/or Waterlox Marine finish.
I was thinking I might get this book, seems to be a fair amount of "wood" bathroom ideas in it. And I can't quite tell, but it seems like it's kind of a step by step book,so maybe it will tell us exactly how to do it? Maybe not, maybe it's just ideas. AT this point I'm full of ideas, it's practical "how to" I need.
http://www.amazon.co.uk/Ideawise-Bathrooms-Inspiration-Do-yourselfer/dp/1589232038g
I wish the wise people of this forum would chime in just a bit more on this one, hint hint ;)
aekekk, can you tell us how you attached to the wall? And can you post a pic?
HOpe you have good luck with this, we won't be do anything til summer at least.
seedsilly
Autore originale16 anni faMore info on the book
"Synopsis: More than 250 inspirational photographs, detailed diagrams, and complete step-by-step instructions help homeowners design and build a functional, relaxing retreat, covering everything from fixtures and lighting to color, texture, furnishings, and accessories to suit any taste or budget."
another source for the book.

terezosa / terriks
16 anni faCement board is NOT waterproof. Moisture can pass through cement board. You either need a vapor barrier behind the cement board, or some sort of waterproofing on the surface of the cement board. And for the record, I think that wood on the walls of an interior shower is a bad idea and maintenance nightmare.
MongoCT
16 anni faI once had an architect spec out a bathroom that was teak strips over Kerdi, the adhesive was to be Bostiks Best.
Bostik's is a GREAT adhesive, it's what I use for glue-down flooring.
Schluter said it would work.
Bostiks said it would work.
I didn't like the homeowner, though, so I turned down the job and didn't build his house.
Mongo
seedsilly
Autore originale16 anni faterriks: thanks for the reminder on the vapor barrier. We might just take our chances with the wood shower. I figure if boats/canoes etc can be made of wood, a shower can have some wood in it. We had an outdoor wood shower in Hawaii and it was great. Course, I'm not planning to mimic that rental, that shower was made of treated lumber. The view made up for the type of lumber.
Mongo: thanks for the tips on adhesives, etc. So, install kerdi all over, then glue the wood to the cured kerdi (maybe tongue and groove with silicone caulk between the boards as aekekk suggested)? Maybe with kerdi silicone would be unnecessary. Then again, why have water accumulate in the grooves if you can avoid it.
PS, Mongo, remind me to never irritate you, or you might stop advising me ;)
MongoCT
16 anni faThis is one of those times that I'll tell you not to take my previous post as gospel.
I'd recommend you call Schluter's tech line and tell them you want wood over Kerdi. See what their advice is.
Had I proceeded with the teak over Bostiks over Kerdi, the combination is unorthodox, so I'd have gotten the "thumbs up" from them in writing.
So call Schluter and get whatever advice you can directly from the horse's mouth. Some of their reps go by script only, some go beyond the written words and will help you think a process through.
Mongo
wildeyes
16 anni faYou might want to check out this webpage, and the other pages on this site, for ideas and/or products, including teak shower floor panels. There's also a discussion of these products somewhere below on this forum.
Here is a link that might be useful: teak shower floor panels
lbgary
16 anni faHow about this: Assemble panels with your slats vertical and screwed from the back to horizontal battens, which are screwed with stainless machine screws into threaded inserts anchored in smooth stucco. The machine screws would be accessible through the gaps in the slats so the panels could be removed for cleaning, and caulking could seal the screw/anchor connection. The idea of stucco would be that you have a continuous, pretty waterproof surface (think swimming pool) that would back up your wood. Gary
cherun_2008
16 anni faWow thanks for all the great advise.. I am pretty sure we will do wood as just feel it can be done, and love the look of the outdoor showers. Printing off all the great info and will decipher.. we may not start our project for a couple of more weeks, but definately want to have it done by June.. so will update what we do and will check the site for more great information.
seedsilly
Autore originale16 anni faThanks again everyone for the advice. We hope to make this happen, sometime this summer maybe.
bryanmont
16 anni faI will be starting my wood shower walls in the next month. The shower is 7' x 4'. The floor will be tile and the ceiling will be copper. The walls will be 6" T&G cedar installed horizontal. I am installing cement board and sealing the seams with thinset just as you would for tile. I will then waterproof the cement board with a paint on waterproofer.(Red Guard is one brand) The first piece of cedar will be face nailed with galvanized finish nails. The subsequent pieces will then be nailed through the tongue at a downward angle and into the studs. Each subsequent piece then covers up these nails. You will have to mark the studs on the ceiling and floor before installing the cement board so you can locate them later. I use a 15ga. finish nailer. This is the way I install T&G wood ceilings in homes. T&G flooring is installed in a similar way except they usually use cleats or staples instead of finish nails. I may also glue the pieces on with a construction adhesive, but I don't believe it will be necessary, as the nails typically hold very well. I will finish off by sanding the walls flat and then putting on several coats of a marine urethane. Hope this helps. If I finish first, I will post some pics. If you finish first, please do the same. I would enjoy seeing the finished product. THanks.
bradleyj
16 anni faWon't punching a hundred nail holes in the Redguard pretty much eliminate its effectiveness as a waterproofing membrane? Or will the urethane make up for that? I am curious because I am thinking of doing something similar in my guest shower.
pharaoh
16 anni faBryan,
I am doing wood panels inside my shower too (this is a tub surround). Two walls will be wood and one will be marble. The marbled wall will use kerdi as the waterproofing membrane.
The wood is 1" thick bubinga. I found (in LA) a bundle of lumber that came from a single tree which means it is all book matched (!!). So each panel is simply two pieces of lumber glued together. These will be screwed to the studs. Then I am using a prefab shower panel for the shower controls. So only a hot and cold outlet through the solid wood panels.
Will post photos in about two months when the bathroom gets done :)
bryanmont
16 anni faIf I do a diligent and correct job with the urethane, the nail holes should not be a problem. The red guard probably isn't even necessary. The concrete board isn't necessary either as long as the urethane seals everything up. Concrete board is used with tile because it will still hold tile and not mildew and rot even if moisture does find it's way behind the tile. So the concrete board is just my first line of backup in case this happens. The red guard is my second line of backup. I'm hoping that neither is actually needed.
pjtime
8 anni faMy sister did her shower/tub surround in plywood and used marine polyurethane to coat it. It worked fine, was used for years and she had 3 kids and a construction guy hubby. They were poor and this was the only option she could think of to fix the prior old tile surround, which had leaked for years prior to her buying the house and rotted the wood behind it. It was an old house. I believe you can use anything you want if you keep it sealed. She screwed hers up on the edges to the studs and trimmed with 1x2's to cover the screws. Sounds schlocky, but I was stunned by how beautiful it was. This was 20 years ago and I'd never seen anyone use wood as a surround before. It just goes to show what you can do with little money and a lot of imagination.
pjtime
8 anni faOne other thing about my sis's project wood tub/shower surround...about 10 years later she sold the house (Las Vegas) the same week it was listed, with that same surround, for a very good price. So the homemade job did not hinder the sale. In fact, she totally remodeled the house, knocking out the entire front exterior walls to install windows, etc. She really did a lot with little.
Allen Mountain
7 anni faFor the floor it would have to be wood slats sitting above a bowl that drains to the drain with only taking up say two to three inches and the walls would have to be plexiglass with rubber o ring's then you put your plexiglass walls up for the shower drill holes for where you want to put rubber o-ring on through a bolt to hold them together then you have your clear walls Cedar lapped walls and your Cedar floor drains into a 2-inch Bowl in high for your drain
pjtime
7 anni faIt's OK even years later becauseDIYers who haven't done the project yet are still interested. I'm always coming up with what I thought was a new idea only to find it's been on Houzz, so I'm always checking Houzz for ways to get my ideas accomplished.
In the new steam showers some companies are using teak slats for the shower base/floor and seat. The teak shower base sits on the shower floor and you can lift it up to clean the floor with vinegar. It's just slats with 2 or 3 cross pieces holding the up out of the water. They are probably glued and stapled, but I haven't seen them in person. Perhaps the teak is waxed to protect it, like the TV tray sets you buy. Sooner or later that would wear off, but perhaps there's a wax you can buy to recoat.

Lois Schwarz
7 anni fai want my contractor to do me a wood shower, but he is afraid to. i will be watching him like a hawk and i will be sure to tell him what i want. i may just do it myself with all this info.. thanks.
pjtime
7 anni faI think most contractors are by nature imaginative, creative and think outside the box, but they won't do things for clients because of liability issues. If we do it and it doesn't work out, we own it. If they do it and it doesn't work out, they might face lawsuits. To me it's a lot easier to do it myself or work with a handyman when I have an idea that is out of the norm. If it doesn't work, I'll tear it out, but it usually hasn't cost a lot and is worth the venture a try to achieve a different look. With all the new glues, water resistant membranes & waterproofing, finishes, raw materials, etc., I think you're limited only by imagination and money.
A shower is an important area because of the potential water damage to surrounding walls and rooms. However, I think the tendency nowadays is to be too cautious and you end up with the same boring and expensive choices in materials. My sister did a bathtub surround--not a shower surround. That's a whole different project to tackle and I'd be really fanatical on how the shower pan and drains are put together, or perhaps use a prefab acrylic pan with the slatted teak floor rack above it. A prefab pan in brown or black with the rack would sure simplify installation and still meld nicely with wood walls. And you could easily clean the underfloor base of bacteria and replace the rack if it starts looking bad or weakens. Sometimes you find the acrylic shower bases on sale for cheap. I really wouldn't worry at all about wood walls using marine grade finishes on the wood. It might require an occasional recoat, but I doubt all that often if it's not abraded with Ajax or similar cleaners. Teak is naturally water resistant I think, which is why it is used so often in boat building. My parents had a teak boat built in the 1940's, but they refinished all the teak in I believe spar varnish. I don't remember how they handled the hull when they pulled it to clean. I don't know how teak holds up if left raw. I know many modern teak products have some kind of wax finish and it's pleasant to touch.
I personally would have no problem buying a house with a wood shower if it appeared to be properly and well done. I'd think it was neat. I'd love having it and using it. My sister's bathroom was mid-size, and between that shower surround and the wallpaper she used, it was quite stunning and unexpected for a middle class suburban home.
pjtime
7 anni faI'd like to clarify my comment: My sister did a bathtub surround--not a shower surround. That's a whole different project to tackle...
It was a combo tub/shower, so the walls were still exposed to the water any shower might have. She had to tear out tile to repair plumbing. Being unable to find replacement tile, she decided to use wood. It held up fine. However, she didn't have to deal with a shower pan in that renovation.

Ricarica la pagina per non vedere più questo specifico annuncio
aekekk